Enabling and using the Resubscribe Functionality in Pardot can turn out to be a tricky one.
To explain briefly, if a Prospect Unsubscribes from any of your Newsletters or clicks Unsubscribe from all on the Preference Center, they do not receive any communication from us. If they want to opt-in again for a Newsletter or Sign up for an event, they can now choose to resubscribe to start receiving reminders or invitations by email in the future from us.
To enable this feature in Pardot a few steps need to be taken:
- The feature needs to be enabled from Pardot Settings
- Texts to be displayed on the Form, in the email and on the Resubscribe Confirmation page need to be provided.
- Email template needs to be created for the email that will be sent out with more information and the Confirmation Link when the prospects click the link on the form
- Form Layout template needs to be tweaked for this feature to work
Let us start with step 1 here to enable the feature in Pardot.
Image: Pardot Settings
Selecting the checkbox opens the section below:
- You can select the Resubscribe Email Template that you create here.
- You can customize the text for the Resubscribe Prompt that would be displayed under the Email text box on the form when an Unsubscribe prospect is filling up the form.
- Once the prospect clicks the link, the Email Confirmation Text will be displayed on the form.
You can use the default Email template layout that is provided by Pardot for using this feature. This template has the {{Resubscribe}} field added to the Email Content. This will enable Pardot to resubscribe this unique prospect. You can customize this template as you wish. It is only important to retain this field so that the feature can work correctly.
Image: Default Resubscribe Email Template
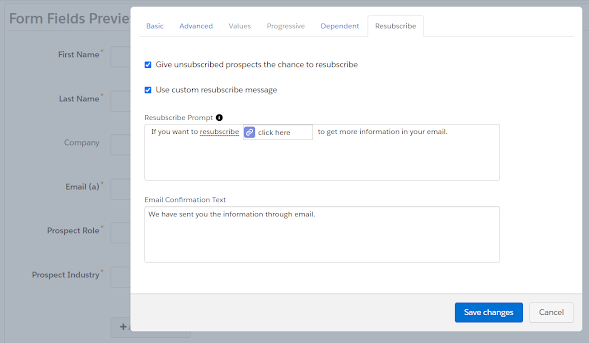
You can also customize the Resubscribe prompt for each form or choose not to have the resubscribe functionality for a particular form. You can select that by going inside a form in Pardot, editing the Email field and opening the Resubscribe tab.
Image: Email Field in Form - Resubscribe Tab
The
Give unsubscribed prospects the chance to resubscribe checkbox lets you enable or disable the functionality for this particular form. The
Use custom resubscribe message checkbox lets you customize the prompt text for this particular form.
Once a prospect clicks the link received in the email, a confirmation message is displayed to them. You can customize this message by going to Pardot Email, opening the Unsubscribe Page and editing it. You can find the Resubscribe section at the end where you can put in your text.
Image: Resubscribe Text in Unsubscribe PageThe last and the most important step for all this to work is step 4, where a small piece of code in the Form Layout template to be used with the forms needs to be changed, for this feature to work. If you open a Form Layout template, you will see a piece of code:
<base href="http//go.pardot.com" >. You can either replace it with your Custom Tracker Domain or leave it blank. It also works if you delete this line of code completely.
Image: Form Layout Template
Now you are all set to try out the Pardot feature that you have newly enabled. Testing it a couple of times and making sure the tested prospect's mailability shows as Opted in show complete the process. While testing, make sure that your email template is ready with the Resubscribe field inserted in it and that you have enabled the feature from Pardot settings as well. Testing either of them individually will throw errors. They need to be tested together for the feature to work correctly.


Comments
Post a Comment